| What's the problem? | Why it happens? | The solution |
| 1. Belt edge wear and broken excessively | 1) Off centre loading | Adjust chute to place load on centre of belt and discharge material in direction of belt moving. |
| 2) Material Spillage and cumulation | Improve loading and conveying conditions, install cleaning devices, improve maintenance. |
| 3) Bowed belt | For new belt this condition should disappear soon, otherwise the belt must be straightened or replaced. In the meanwhile, should check storage and handling situation. |
| 4) Belt hitting structure | Install training idlers on carrying and return sides. |
| 5) Belt too rigid for adequate troughing | Install a more flexible belt. |
| 2. Stripping of cover | 1) Impact of materials on belt | Reduce impact by improving chute design, install impact idlers or impact bed. |
| 2) Skirt board improperly adjusted or of wrong martial | Adjust Skirt Board support to minimum 25 mm between metal and belt with gap increasing in direction of belt travel. Kindly note: use skirt board rubber (not old belt). |
| 3. Severe pulley cover wear | 1) Material trapped between belt and pulley | Install scraper on return run ahead of tail pulley. |
| 2) Spillage on drive pulley | Increase tension, lag drive pulley, increase arc of contact. |
| 3) Sticking Idlers. | Free idlers and improve maintenance. |
| 4. Cover harden or crack | 1) Heat or chemical use condition | Use belt designed for specific condition. |
| 2) Improper storage or handling | Refer proper storage and handling instructions. |
| 5. Cover softening or swells in spots | 1) Contamination by spilled grease, overlubrication of idlers | Improve house-keeping, reduce quantity of grease used, check grease seals. |
| 6. Cover bubbles | 1) Cover cuts or very small punctures | Make spot repair with vulcanizer or self curing repair material. |
| 7. Short breaks in carcass parallel to belt edge, start break in carcass | 1) Impact of material on belt. | Reduce impact by improving chute design, install impact idlers or impact bed. |
| 2) Material trapped between belt and pulley | Install scraper on return run ahead of tail pulley. |
| 8. Transverse breaks | 1) Belt edges folding up on structure | Readjust idlers in affected area, install limit switches provide more clearance. |
| 2) Improper transition between troughed belt and terminal pulley | Adjust transition as recommended. |
| 3) Severe convex, vertical curve. | Decrease idler spacing in curve, increase curve radius |
| 9. Lengthways carcass break with covers intact. | 1) Belt running off centre and folding over | Use limit switches and determine reasons for belt running out. |
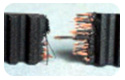
| 10. Belt breaks at or behind fasteners, fasteners pullout | 1) Wrong type of fastener, fasteners too tight or too loose | Use proper fasteners, set up schedule for regular fastener inspection. |
| 2)Fastener plates too long for pulley size | Replace with smaller fasteners, increase pulley size. |
| 3) Tension too high | Increase speed, reduce friction decrease tension by increase arc of contact. |
| 11. Ply separation | 1) Pulley too small | Use larger diameter pulleys. |
| 2) Heat or chemical use condition | Use belt designed for specific condition. |
| 3) Too many reverse bends | Use more flexible belt. |
| 4) Mildew or dust penetration into carcass | Prevent cuts, arrange for immediate repairs. |
| 12. Particular section of belt runs to one side at all points on conveyor | 1) Belt not joined squarely | Remove affected splice and re-splice. |
| What's the problem? | Why it happens? | The solution |
Broken
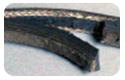 | 1. Foreign object in drive
2. underdesigned drive
3. sharp band caused tensile cord damage | 1. shield drive
2. redesign drive
3. follow proper storage and handling procedures |
Excessive sidewall wear
 | 1. worn of damaged sheaves
2. Misalignment or non-rigid centers
3. Bent flange | 1. Replace of sheaves
2. Align drive or reinforce mounting
3. Straighten flange |
Crack
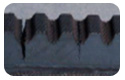 | 1. high temperature
2. sheave diameter too small
3. slippage | 1. remove heat source
2. redesign drive
3. retension drive |
Cord Failure
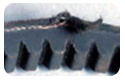 | 1. high temperature
2. sheave diameter too small | 1. remove heat source
2. redesign drive |
Broken
 | 1. Foreign object in drive
2. underdesigned drive
3. sharp band caused tensile cord damage | 1. shield drive
2. redesign drive
3. follow proper storage and handling procedures |
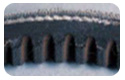
Wear
 | 1. the tension force is not enough
2. Belt is too wide | 1. make the belt fastened
2. Fit the belt with proper steps |
Crack
 | 1. high temperature
2. sheave diameter too small | 1. remove heat source
2. redesign drive |
Rob failure
 | Wrong Equipping Belt or Driver | Make sure that Belt is fixed well |
| Belt Noise | 1. belt slip
2. misaligned sheaves
3. wrong belt type | 1. retension
2. realign sheaves
3. replace cut edge with wrapped belt |